To optimize the selection of a vibration isolator one should consider:
- device’s full mass
- amount of points of support
- load concentration on a point of support
- rotational speed of spinning/rotating elements
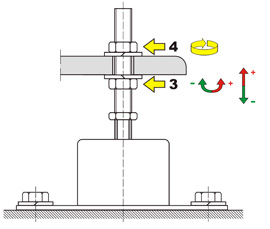
The drawing presents the fixing method of WPS® can(nned) vibration isolators to a mounted device.

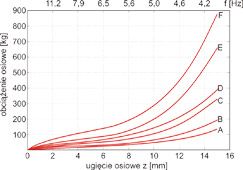
Canned vibration isolators selection and construction data tables.
| Type and size of a vibration isolator | Axial load range [kg] | Natural vibrational frequency [Hz] | Minimum percentile effectiveness of vibration isolation at a specified driving frequency in [Hz] or [rpm] | |
|---|---|---|---|---|
| 50 Hz 3000 rpm | 25 Hz 1500 rpm | |||
| WPS 50 – A | 5 – 25 | 10,2 – 6,3 | 96 | 81 |
| WPS 50 – B | 20 – 40 | 7,5 – 6,3 | 97 | 91 |
| WPS 50 – C | 35 – 55 | 7,0 – 6,3 | 98 | 91 |
| WPS 50 – D | 50 – 85 | 7,0 – 6,3 | 98 | 91 |
| WPS 50 – E | 75 – 125 | 7,0 – 6,3 | 98 | 91 |
| WPS 50 – F | 100 – 150 | 6,8 – 6,3 | 98 | 91 |
| WPS 90 – A | 40 – 100 | 5,3 – 4,2 | 99 | 96 |
| WPS 90 – B | 60 – 150 | 5,0 – 4,2 | 99 | 97 |
| WPS 90 – C | 100 – 260 | 5,0 – 4,2 | 99 | 97 |
| WPS 90 – D | 200 – 320 | 4,7 – 4,2 | 99 | 97 |
| WPS 90 – E | 280 – 520 | 4,8 – 4,2 | 99 | 97 |
| WPS 90 – F | 450 – 700 | 4,6 – 4,2 | 99 | 98 |
| Type and size of a vibration isolator | Mass 1 pc. [kg] | Dimensions [mm] | Screw** | |||||||
|---|---|---|---|---|---|---|---|---|---|---|
| D | A | B | C | d | H* | hmin* | M | gmax | ||
| WPS 50 | 1,0 | 67 | 120 | 80 | 100 | 9 | 150 | 83 | M12 | 47 |
| WPS 90 | 3,3 | 108 | 190 | 120 | 158 | 17 | 223 | 138 | M20 | 58 |
** possibility of manufacturing a screw with a different thread M and length L.


